Showing posts with label Halloween. Show all posts
Post Icon

Poison Control

I have to admit it—Halloween is growing on me.  Two years ago I put up a few small decorations in a “nod” to Halloween—the first in something like 16 years of marriage!  Last year, I put up a few more decorations.  This year…well, of course I had to expand yet again!

I fell in love with Down to Earth Style’s mantel, which included a very, very cool vintage-style “Poison” sign.

I loved it. 

It loved me. 

I had to make one.  THAT VERY DAY!

(Hers came from HomeGoods.  I designed this one on my Silhouette.)

poison 009u

Of course, that was only the beginning of my temporary insanity…

I used the free Harry Potter Potions labels from Over the Big Moon to spookify my collection of old bottles…

poison 008e

…and a free printable book cover from chickabug to turn a hardback book into a magical tome…

poison 009e

…along with a couple of oil lamps and a creepy-crawly or two, I have an appropriately creepy Halloween display!

poison 006e

And can I tell you how much fun it was to play with the Halloween overlays and enhancements on PicMonkey?

poison 010e

Lots!

poison 006e2

Poison…may cause death…or heartburn!

poison 007e

This sign is also available for purchase in my Etsy shop.

This project has been featured at the All-Star Block Party or Mod Vintage Life.
 
***********************************************
Linking up here:
Domestically Speaking Elizabeth & Co.
   
Friday Remodelaholic 2805
My Simple Home Life’s Simple Creations Friday  
Funky Junk’s Saturday Night Special The DIY Show Off
Stone Gable
Beyond the Picket Fence Someday Crafts
Knick of Time
Mod Vintage Life
My Uncommon Slice of Suburbia
Perfectly Imperfect {Primp}
Common Ground My Repurposed Life
From My Front Porch to Yours All Star Block Party
A Little Knick Knack
Cowgirl Up!
{aka} design
Coastal Charm

  • Digg
  • Del.icio.us
  • StumbleUpon
  • Reddit
  • RSS
Post Icon

Halloween Costumes ~ Princess Witch and Princess Ballerina

Every year I have made my kids Halloween costumes.  It's something I looked forward to ever since Savannah was born.  I have some of the best memories of the costumes my mom used to create for my brother and I.  I loved those costumes and always felt really special wearing them to school and showing them off to my friends.  There's nothing quite like handmade.  I know they only wear the costume for a day, but those memories will last forever.  Trust me, I still remember being Daisy Duck, a clown, a bird, a bunny rabbit, ect. 

It took my girls a little while to decide exactly what they wanted to be for Halloween.  They started out both wanting to be witches, then they wanted to be hummingbirds, then some sort of insect........but they eventually made their final decision ~ a princess witch and a princess ballerina.  I was pretty surprised that Matilda chose a different costume than her sister, but pleased that she seems to be developing her own sense of self.

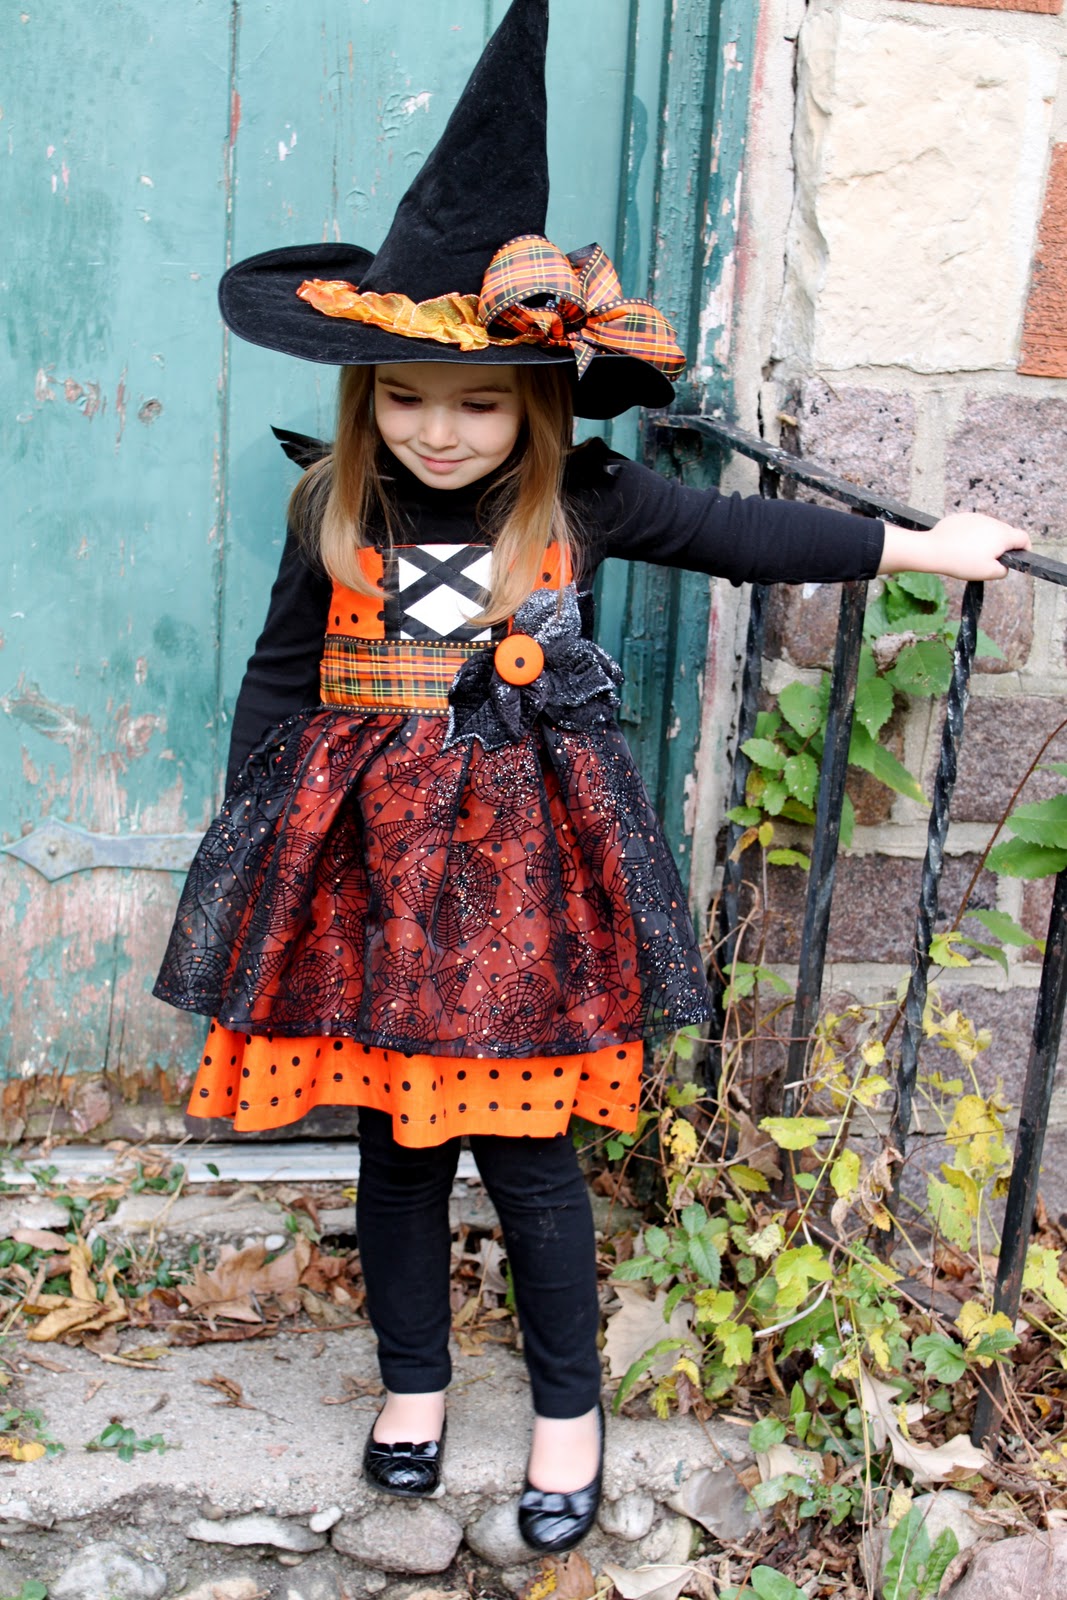
I wasn't exactly sure what these costumes were going to end up looking like, but I figured they couldn't be too tough.  So here is the finished product..........


I didn't use a pattern for either of these dresses.  I went to Joann Fabrics and let the fabrics just kind of guide the way.  I do that a lot.  I go into a store having no idea how something is going to turn out, but once I start pairing fabrics together a vision starts to form.


Miss Matilda loves her princess ballerina costume.  When I finished the look, I tried it on her to make sure it fit and she danced and twirled around for about an hour.  I think she might be my little ballerina, but only time will tell.


This dress was incredibly quick and easy to make.  I simply measured Matilda's chest and measured from under her arm down to where I wanted the dress to fall.  Then I added and inch on the top and bottom to allow for hemming.  I cut a piece of elastic 1" smaller than her chest measurement for the top of the dress and added a ribbon to act like a halter top.


The flower detail in the front of the dress was all stitched after the elastic had been threaded.  These were flowers that I found on a long branch at Michael's craft store.  I simply cut them off of the branch and arranged them on the front of the dress.


The head piece has a backing made of felt and the flower trim and lace is hot glued to the felt.  There is a clip through the felt to hold the head piece in place.


One of my favorite aspects of this dress is the flower trim around the bottom hem.  This is something I happened to already have and I think it adds a nice weight to the dress and makes it really fun and special.  The entire dress is lined because the outer, sparkle fabric is pretty rough on the skin.  Plus I didn't want the dress to be too see-through.


My little sweetheart keeps saying, "Thank you, mama, thank you!" about her special costume.  She makes all the time and effort that goes into creating an outfit well worth it!


The princess witch costume was really fun to create!  It took a little more time than the princess ballerina but that was because there was more detail involved.


The princess witch costume is a double layered skirt with a solid cotton bottom layer and a spider-web top layer.  The top layer is somewhat stiff so it adds a nice volume to the bottom of the dress.  The bodice has a corset-style detail and ties with black satin ribbons on each shoulder. 


I used a large artificial flower I found a Michael's craft store for the detail at the waist and on the hat.  I cut all the petals apart on the flower and placed them how I wanted them.  It's amazing how far one giant flower will go and I still had some petals left over.  The dress is completed with the plaid ribbon around the waist and the coordinating bow on the hat.

 
I can't believe how old my 3.5 year old princess witch is getting.  It's hard to believe that is my little baby in the picture above.  Time really does fly by!  

I am really looking forward to seeing my two princesses in their costumes going door-to-door trick or treating on Halloween night.  I think they are going to have SO much fun together this year.  

Hope you have a super Happy Halloween!

  • Digg
  • Del.icio.us
  • StumbleUpon
  • Reddit
  • RSS
Post Icon

Fall Fabric Pumpkin Tutorial

Since I am taking some time off to enjoy our new baby boy, I thought I would re-post one of my favorite fall tutorials from last year.  I know a bunch of you are new to the blog (thanks so much for joining us), so you might have missed this one.  This is a really easy and inexpensive fall project, but I just love the end result!


It's really starting to feel like fall here in the Midwest.  We still have our occasional warm day, but for the most part fall is upon us.  Fall is my favorite time of year with all the fun festivals, pumpkin patches, apple orchards.......I truly value the beautiful seasons each year.

Since it finally feels like fall, I think it's time to get out some decorations for around the house.  I wanted to make something for our home that tied in with the season as well as our decor.  Though I tend to use bright colors in my clothing design, my home is decorated in more rich tones....think deep red, green, mahogany and cherry wood.  I came up with these chubby fabric pumpkins and can't wait to put them around the house.  I thought you might like to make some too.........so here's the "how to":

Fabric Pumpkin Tutorial

Supplies:
Fabric pieces - variety of sizes
2 pieces of brown felt
1 piece tan felt
Fiberfill or other stuffing material
Brown embroidery floss
Thick twine
Hand-sewing needle
Sewing Machine
Decorative wire berries (optional)

Directions:


Gather your fabric.  I found these upholstery fabric samples at Joann's for $2.00 a piece.  They were discontinued special order fabrics.  I decided to use decorator fabric because I love the variation in textures and designs, but you could definitely used quilting cotton for this project if you would prefer.


Cut your fabric.  I wanted my pumpkins to be all different sizes since no two pumpkins are ever the same.  Here are some of the measurements I used:
17.5" x 10"
17.5" x 12"
12" x 6"
12.5" x 7.5"
17" x 13"
Basically you are looking to cut out a rectangle shape.


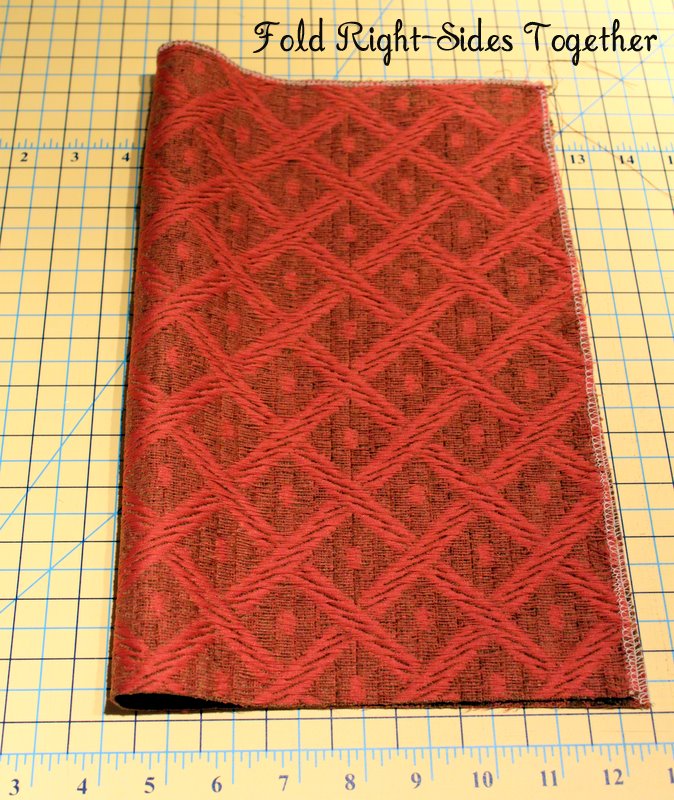
Fold your rectangle, right-sides together.  Stitch down the long-side (side to the right) with a regular straight-stitch.  Then run a gathering stitch around the top and the bottom (leaving the top and bottom OPEN).  Turn right-side out.


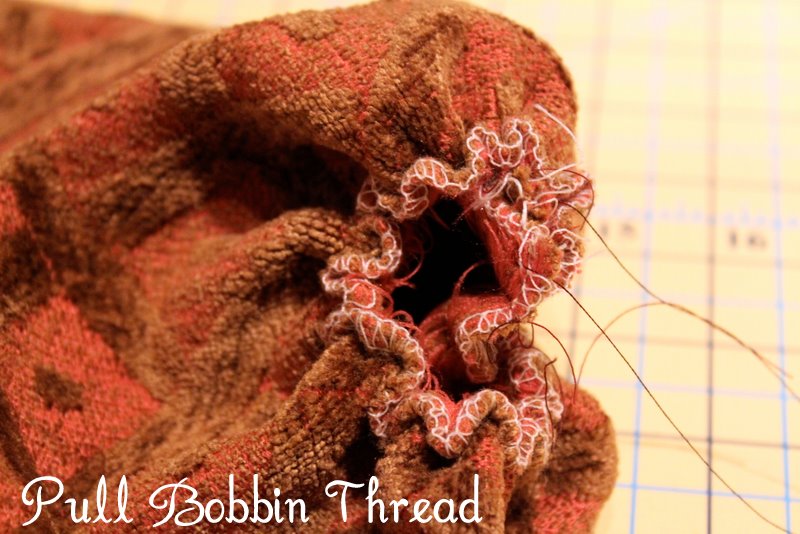
Pull the bobbin thread to start gathering one of the ends.  Work the gather until you have pulled it as closed as possible.  If you are using regular cotton this will be much easier.  If you are using decorator fabrics, this can take some time.  You may also consider hand-sewing a large straight stitch with embroidery floss and using that to gather instead of your machine (my thread broke on one of my pumpkins).  Either way will work. 


This is as tight as I could pull my bobbin thread with the upholstery fabric.  Tie your thread ends together and turn it in-side out again.


Place the gathered end in your sewing machine and stitch to close.  You will have to kind of jam the fabric under the foot as it is very thick, but don't worry, your machine can handle it.  You may also choose to hand-sew the opening closed with embroidery floss.


Next fill your pumpkin with fiberfill or whatever type of stuffing you have on hand.


Once you have stuffed your pumpkin, pull the bobbin thread from your other gathering stitch to begin to close the opening.


Close the opening entirely by hand-sewing.


Take your twine and wrap it around the pumpkin (very tightly).  Do this as if you were wrapping a present.  Loop it around, then cross-over, around and cross-over.  You will cross-over at the top and bottom of the pumpkin.  Go back and forth until you have 6-8 sections on each pumpkin.  Finish by simply tying in a knot.

You may need to slide the twine around until you have even look sections - just work it until you like the look.

Next you will need to make your stems and leaves.  I made each stem a different size, so just cut out whatever shape you like from your brown felt.  I also machine stitched on top of the felt to add some texture.  Place both stem pieces together (right-sides together) and stitch around the curve (leave the straight-side open).  Turn right-side out.


Suff your stem with fiberfill.


Cut out two to three leaves per pumpkin.  I did mostly brown leaves and a couple tan ones.  Again, I machine stitched veins onto the brown felt with brown thread.  This is your opportunity to be creative......cut your leaves out in any shape or size that you like.  Mine were all different.


Next hand-sew your stem and leaves to the top of each pumpkin.  There is no special technique here.  Just place the leaves where you like and stitch away.


You can certainly skip the stitching on the stem and the leaves, but I think it adds a more realistic feel to the pumpkins.


For a final finishing touch, I took a bunch of deep red and green berries and added them to the top of each pumpkin.  This was just one bunch that I purchased at Joann's.  I cut the bunch apart and wrapped two wire pieces around each stem.  To make the curls, wrap the wire around a pen or pencil.


On a couple of the tan leaves, I hand embroidered some detail.  I like the contrast between the tan leaves and the brown ones.  You could hand-embroider all of the leaves or machine-stitch all of them......again, it's up to you.


And there you have it - a family of festive fall fabric pumpkins!


They are just so cute, don't you think?  I could just squeeze them!  Well, I won't, but my daughter Savannah already did......she gave each one a hug and said, "I love you pumpkins!".

Happy Fall!

  • Digg
  • Del.icio.us
  • StumbleUpon
  • Reddit
  • RSS
Related Posts Plugin for WordPress, Blogger...

visitors map