Showing posts with label dining set. Show all posts
Post Icon

French Country Dining Set

The workshop has occupied so much time and attention this summer that I have a LOT of furniture projects waiting for me! 

I’m at the point of wondering “what to tackle next?” 

I decided to go for the biggest bang—as far as reclaiming space is concerned! 

The table was dismantled, so it wasn’t taking up much room…but I had FIVE finished chairs stacked up in my bedroom, so I decided to finish the set so I could at least have my room back!

frenchcountrytable 001

If you’ve been with me for long, you know I have a long and glorious history with pressed-back chairs. 

I love ’em. 

One of my first major projects was this gathering table:

…and I loved it so much I later refinished a similar table in black:

Then there was my grand idea of refinishing a dining set with different pressed-back chairs for myself:

…which I didn’t end up keeping, but another friend of mine decided to run with the idea.  She bought up grundles of pressed-back chairs, and I finished them for her.  When she had multiples, though, I received some of the chairs back…in payment!

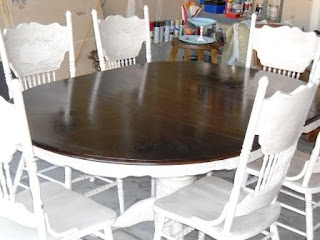
And that, dear friends, is why I had five pressed-back chairs cluttering up my bedroom!  As luck would have it, I found a sixth chair at Deseret Industries recently, and I was given this table (don’t you love the legs??)…

…what if I put them together??

Ahh…a match made in heaven!

signs 003

The table top was sanded down and re-stained in Minwax Dark Walnut, which for some reason didn’t want to get very dark.  I liked it anyway.

frenchcountrytable 003

The six chairs—all different—are painted with a Behr Color match of Sherwin-Williams “Creamy.”  They are glazed with a watered-down burnt-umber craft paint.  That is NOT my preferred form of glaze anymore—but some of these chairs were started long ago, and everything needed to match!

pressedbackchairs

I like these table legs better…

frenchcountrytable 009

I had fun dressing up the table a little bit….

frenchcountrytable 012

…someday I’ll have a table that looks good with this doily runner; it’s my goal in life!

frenchcountrytable 011

Anyone up for an al fresco dinner?

frenchcountrytable 010

***************************************************
This project has been featured at Elizabeth & Co. and Domestically Speaking.
***********************************************
Linking up here:
Domestically Speaking Elizabeth & Co.
Primitive & Proper The CSI Project
Friday Remodelaholic 2805
My Simple Home Life’s Simple Creations Friday Miss Mustard Seed’s Furniture Feature Friday
Funky Junk’s Saturday Night Special The DIY Show Off
Beyond the Picket Fence Someday Crafts
Knick of Time My Uncommon Slice of Suburbia
Perfectly Imperfect {Primp}
Common Ground My Repurposed Life
From My Front Porch to Yours All Star Block Party
Cowgirl Up! {aka} design
Coastal Charm

  • Digg
  • Del.icio.us
  • StumbleUpon
  • Reddit
  • RSS
Post Icon

Two-Tone Table

I actually wanted to call this the “Two-Friends-Two-Tone-Table,” but that was kind of a mouthful!

chocolatetable2 003

Once upon a time, one of my dear friends got it into her head that she wanted me to refinish a dining set for her.  The fact that she lives 750 miles away from me was no deterrent to her…nor was the fact that she has never physically seen any of the pieces I have refinished.  She was determined!

So the search began—long distance and on-line—to find a suitable table.  We were on a tight budget, since her husband is one of the nation’s many unemployed.

Enter Friend 2.  Upon hearing of our search, she offered to let me have a vintage dining set that had belonged to her husband’s mother.  Yes, let me have.  As in—for free.  She knew it was for another friend of mine, and that they had no money.  So out of the goodness of her heart, she donated to our “cause.”

Friend 1 and Friend 2 don’t know each other, and probably will never meet.  But bless them both, for having faith in ME to put this little transaction together!

The table was completely disassembled when I first saw it, but I fell for the chunky legs…hard.

Stacy 002-1

The table top has pull-out leaves on each end and a beautiful apron (it’s the piece on the right, leaning up against the dresser that later became yellow).

Stacy 001

Plus a pretty stretcher (it’s not quite so blurry in real life).

Stacy 005

And six chairs, one of which is an arm chair.

Stacy 004-1

Friend 1 only ever saw the pictures, but she trusted me to bring this dining set into the current century!  I’m sure she had a few misgivings along the way, though!

There were a lot of loose joints and such, so I had to do some gluing (this Bessey clamp was a marvel to work with—I borrowed it from a friend, and almost didn’t give it back):

stairs 038

…as well as some creative repair work on the arm chair.  The dowel had broken off, so I used a 3/8” paddle bit to drill out the old dowel, and then I cut a new one to replace it and re-glued the arm back on the chair.

Stacy-1

I enlisted some of my short help to sand chairs…

stairs 044

He looks thrilled, doesn’t he??

I sanded the table top completely down—you can see how dark the original finish was on the leaves! 

stairs 037

The rest of the table top was not in nearly that good of condition!

stairs 035

The grooves on the top of the table reminded me of a checkerboard, and inspired me to try a two-color staining job.  The only problem was that the grooves did not extend down the sides of the table top—but that was nothing a little work with a handsaw and some black paint couldn’t fix!

Stacy

I painted the base of the table (and the chairs) black, and distressed them to highlight the turnings and carvings. 

chocolatetable2 015

chocolatetable2 004

The dark stain on the table is Minwax Antique Walnut, and the lighter stain is Pecan.

chocolatetable2 003

Here you can see it with both leaves extended.

chocolatetable2 007

chocolatetable2 009

I love how the checkerboard effect shows up even on the sides with the leaves closed.

chocolatetable2 013

I wasn’t brave enough to pick out fabric for the chairs for someone else, so with the help of another friend, we took lots of pictures of bolts of fabric and sent them (via iPhone) before she chose this pretty black floral/paisley print.

chocolatetable2 005

The fabric on the seats wasn’t really dirty or in bad condition, so I didn’t remove it—I just added a new layer of batting and stapled the new fabric over all…plus a bit of my sleeve…  (whoops!)

house 003

And there you have it:  the Two Tone Table!  I really love the look of it.  It wouldn’t have been bad at all in my now-empty front room

chocolatetable2 016

…but alas…my friend came and took it away (yes, from 750 miles away). 

I hope it’s happy in its new home!

******************************************

Thanks to It’s So Very Cheri, Stylish Once Again, My Repurposed Life, and Simple Home Life for featuring this project!

*******************************************************

Linking up here:

Coastal Charm’s Nifty Thrifty Tuesday Topsy Turvy Tuesdays
Domestically Speaking’s Power of Paint Someday Crafts’ Whatever Goes Wednesday
Hookin’ Up with House of Hepworths No Minimalist Here’s Open House Thursday
Friday Remodelaholic 2805
My Simple Home Life’s Simple Creations Friday Miss Mustard Seed’s Furniture Feature Friday
Funky Junk’s Saturday Night Special The DIY Show Off
Primitive & Proper I Heart Naptime
Beyond the Picket Fence’s Under $100 Party My Uncommon Slice of Suburbia
Perfectly Imperfect {Primp}
Mod Vintage Life My Repurposed Life
Stylish Once Again It’s So Very Cheri
Common Ground Thrifty Décor Chick

  • Digg
  • Del.icio.us
  • StumbleUpon
  • Reddit
  • RSS
Post Icon

Oh Stanley...you're just so pretty!

This project has been featured on Better After.
***********************************************************
Link
I'm sure a guy named Stanley wouldn't appreciate that remark. However, I just finished a BIG dining room set made by Stanley Furniture...and well, you know the rest. It's just so pretty!

I didn't always feel that way about Stanley. Here's what I started with:


Six chairs with those gold velvet cushions. I don't know about you, but I am so over gold velvet. (What year were those popular, anyway??) And yes, two of the chairs had broken caning, so I got some more experience at replacing cane! (The story in pictures of that adventure can be seen here.)


The table definitely had some really pretty details, but you had to look past the brassy gold trim, orange-y table top, the yellowish-white paint, and the black specks! Why was the whole thing covered in black specks? And no, it wasn't an accident...it was really/truly part of the finish.


Then there was a buffet and china hutch. Again, the same funky speckled paint job. The hutch doors had some sort of a faux-wire treatment in front of the glass. I've seen chicken wire in hutches that looks pretty cool...somehow it just didn't work with this set. Then the back of the china hutch was covered in a very brassy-gold mottled paper. Not my favorite look.

Here's the after...
(be prepared for a LOT of pictures!)


I do recognize that it seems a little funny...or snooty...or snotty maybe...to make fun of one shade of white only to choose to paint another shade of white. So be it. At least mine doesn't have funny specks, and it's not all yellow-y! I used Behr Ultra paint in Pillar White. The stain on the table top is Minwax Jacobean--FOUR coats of it! I used some stain to highlight details, as well as Minwax Dark Wax. I did not distress any of these pieces. I tried it on one chair, but I wasn't a fan of the speckled yellowish finish showing through!


The chairs were slipcovered ala Miss Mustard Seed (in fact, the whole makeover was inspired by her beautiful dining room set). Yes, they're made out of drop cloths. I love that stuff. I made miles of box pleats (well, it seemed like miles) to go around all six chairs! I used a narrow irridescent white ribbon on top of a cream-colored grograin ribbon for the ties. When the slipcovers were all done, they seemed a little blah to me...so I painted two random stripes on each seat. Some are centered, some are not! It gave a little pizzazz to the chairs.


Although the buffet top was originally painted, I chose to stain it to match the table instead. If someone chooses to use it by itself, I think it gives it a lot more appeal (that's what I tell myself anyway).


I covered the back of the hutch with wallpaper that has a subtle white and silvery-gold stripe. I already had it on hand--and when I held it up, it was perfect.

I used all the original hardware. I painted them with Rustoleum ORB spray paint, but they were a little blah, too. So I experimented with Rub-n-Buff for the first time, and I love it! It's glaze for metal! I rubbed a little on the edges of all the pulls, and it gave it a whole different dimension. I'm definitely a fan.


So what do you think of Stanley now?

This set is available for purchase. You can see it at Re-Creations ( 5508 South 1900 West, Roy, UT, or you can e-mail RedHenHome@gmail.com for inquiries.


Photobucket
The Shabby Nest


Photobucket

Furniture Feature Fridays

Funky Junk's Sat Nite Special

The DIY Show Off


Domestically Speaking

  • Digg
  • Del.icio.us
  • StumbleUpon
  • Reddit
  • RSS
Related Posts Plugin for WordPress, Blogger...

visitors map