Showing posts with label recipes. Show all posts
Post Icon

in autumn, making quince jelly


It is a shame that blogger doesn't have a 'smell' button I could attach to this post!

I am making quince jelly, and the whole house is perfumed with their delicate flower-like flavour.


Large, rock hard, chunky sort of fruit, tasteless raw, yet when it is cooked it shares
 all sorts of secrets, and its jelly turns a beautiful deep pink colour.

It takes ages to make, but still has to be one of my favourite jellies to spread on bread, 
or use in  tarts with other fruit.

Here is the recipe, but believe me , this jelly is quite hard work!!

For about 3 lbs or 1.5kg of quinces.

Wash the qunices well and cut away any pieces that are damaged or discoloured.
Cut the rest of the fruit into cubes, don't worry about  peeling or taking out the core.

Thrown into a big preserving pan with 1/2 litre (1 pint) of water.

Cook for 60-90 minutes until well tender.

Find a way to let the fruit drain overnight.
 I have a rather 'heath-robinson' affair with a stool turned upside down,
and a muslin strung over a big mixing bowl to catch the juice.

The next day measure out how much liqud has come from the fruit pulp.
Resist the temptation to squeeze the muslin too hard, if you want a very clear jelly.

For each half litre (1 pint) of juice, you can add 350 grammes (12 ounces) of sugar.
Heat gently and simmer for about 15 minutes.  Quinces contain a lot of pectin,
so there isn't usually a trouble with this jelly setting.
The best way to test for setting is on a plate kept cold in the fridge.

When setting point is reached, pour into jars and ... admire!


And if you love the flavour and hate to see the fruit pulp wasted, you could always make quince

jelly squares, quite yummy with cheese!

After extracting the juice for your jelly, push the remaining soft fruit through a sieve, and mix equal weight of sugar to the sieved fruit paste.  Cook until thick enough to 'write' in with a wooden spoon and turn out onto a greaseproof paper lined baking tray.

Let it rest for 24 hours then cut into squares,
YUM!


Wishing you all a happy autumnal weekend.


  • Digg
  • Del.icio.us
  • StumbleUpon
  • Reddit
  • RSS
Post Icon

paris in the rain - drinking hot chocolate


 It is tipping down with rain as I write and I find myself longing for a romantic rainy day in Paris.

 Paris in the rain makes me feel comforted and lazy and warm ...

above all, paris in the rain makes me long to drink hot chocolate .....


I adore hot chocolate -  this is not a state secret -  it is my drink when out at early morning fairs, or in front of a fire in the afternoon, a drink that unites, that comforts, that smooths out rough edges


To make a very special, very French hot chocolate, you have to forget about
 hot chocolate in powder form.  You need the REAL THING


 Here is how I make it for those special afternoons.  Warm a pint of milk slowly in a pan, then break about 100 grammes (half a large bar) of good quality dark chocolate into the warm milk and stir carefully until all the chocolate is melted.  Now add some thick cream and keep stirring, then sugar to taste.  Here you can take a whisk and give some froth and softness to your warm perfection.

Pour into individual cups or bowls, add a little chantilly, or whipped cream to the top if you wish , and sprinkle with cocoa powder and some finely grated chocolate.

Some people favour a little cinnamon in the warm chocolate mix, I personally prefer it simple.


To be sipped slowly, in front of a roaring fire, preferably accompanied by a little brioche bought as you rushed out in the rain to the bakers on the corner of your rainy paris street.

How we love the autumn!


Not my pictures I'm afraid, I was too busy drinking the stuff to shoot it properly!
All images with thanks to Google.


  • Digg
  • Del.icio.us
  • StumbleUpon
  • Reddit
  • RSS
Post Icon

french plum tart


Here we mostly eat fruit in season locally.  Better flavour, more eco-friendly and it's another way of enjoying the change of seasons.


In normandy we are now in the season for the smallish purple blue plums called Quetsches.  They are nice eaten off the tree, but to my mind they are best in a tart.  Some like the tart with a cream base on the pastry, I prefer the simplest way, just pastry, sugar and the fruit.


Individually for dinner parties, large and round for family meals, or long and chic for special moments, this recipe is quick and easy and sure to please.


To make the perfect tarte aux quetsches, simply roll out your favourite pastry and fit to whichever mould you choose to use.   Cover with baking or waxed paper, and weigh the paper down with baking beans, then pop in to the oven to bake blind, or pre-bake for about 15 minutes.  Remove the paper and bake for a further 5 minutes until the base is very slightly golden.


While the pastry is cooking, cut the plums in half and remove the stones.  You need enough plums to cover the pastry in a generous layer of fruit.

Remove the pastry base form the oven and sprinkle with sugar.  Some people add a little ground almond at this stage.   Lay the plums carefully overlapping the fruit pieces.  Sprinkle with more sugar.

Bake in a hot oven, around 190° until the pastry is well cooked and the fruit is well tender, and looks slightly shrivelled.


 A Quetsche plum tart is a favourite dessert here, served just warm with a pouring of creme anglaise.  Yummy!

  • Digg
  • Del.icio.us
  • StumbleUpon
  • Reddit
  • RSS
Post Icon

savoury tart recipe and a giveaway winner


Many of you will be familiar with the traditional French upside down apple tart called Tarte Tatin, but you may not know that the same principal can be used to make a delicious savoury tart as a first course, or to accompany a meat dish.  Le Tatin aux Echalotes  - a shallot tatin!

When cooked slowly in a pan, the shallots develop a deep sweet caramelised flavour that is quite delicious.   The tarts can either be made individually and served as a first course as above, or made as a large tart and slices served to accompany a meat such as a roast lamb.


This recipe works just as well with onions, I have a preference for the long red shallots, mostly  because they are so pretty!


To make the tart you need a pastry base, (either short or flaky, depending which you like best);  enough shallots or onions to cover the base of a heavy pan; olive oil and seasoning.

Peel and cut in half the shallots or onions.  Cook gently in a pan with plenty of olive oil, salt,  pepper and  a little sugar to help them caramelise.


When they are turned a deep rich brown and smelling totally delicious, place the onions into a deep tart mould, or several small moulds and cover with your pastry.  Pop the tarts into the oven at 190° and cook until the pastry is golden brown.  Remove from the oven, and turn them upside down onto your serving plates.  You serve the tart pastry side down, the tops can be decorated with some fresh herbs if you wish.

Another very simple recipe that looks chic and oh so French!  Bon appetit!


And now to the winner of the beautiful oil painting, generously donated to the giveaway by Carolina Elisabeth,   who painted this lovely rose picture especially for readers of my French Country Home.


The lucky name to have emerged from the random draw is Sarah, who writes the blog Hyacinths for the Soul   congratulations Sarah!  If you would like to contact me with your address I shall pass it on to Carolina.  And for everybody who longed to win the giveaway, don't forget it is always possible to order one of Carolina's beautiful paintings from her site.

I hope your week is going well, thank you for reading me , you are the best!


All food photos from google images


  • Digg
  • Del.icio.us
  • StumbleUpon
  • Reddit
  • RSS
Post Icon

teenagers on holiday and french peach tarts


Our short break in the South was spontaneous, hilarious and exactly what I needed after a long summer and before a busy fall.


Less than  a week before we left, I was still searching for somewhere to stay for ... me .... my dear husband ..... our four children ..... their friends .... and two dogs!!  YUP!

This holiday was meant to be.... as a few days before our leaving date, a huge house materialised, complete with a ton of bedrooms, a pool, space for the dogs to run around, easy access to a sleepy little village and bikes for everyone.  For a week we forgot about internet (well almost) forgot about the news, practically forgot about the car, and wandered from pool to table to river to pool to table in a happy haze.

If you are feeling weary, I can recommend no better remedy than heading off with a bunch of youngsters aged between 15 and 21. 


Why was it such a good idea to holiday with teenagers?  

Because they just wanted to relax. 
They liked to smile and laugh the whole time.  
They were not picky - about anything! 
They got up late, which meant I could have a first breakfast and cup of tea alone on the terrace MMMM....
They listened to a most eclectic selection of music, and the house was filled with 
jazz, rap, reggae, rock and classical airs all day long
They let me beat them at cards and at tennis! (OK so they are very polite kids)
and whatever I put on the table was immediately devoured! 

Which brings me neatly around to a favourite summertime dessert

LE peach tart, a feast for the eyes, and super quick and easy to put together.

These are more photos taken by Ella, great pictures in a not so pretty baking tin, plus the tart was left a few minutes too long in the oven, but hey!  these things happen... and there was definitely no tart left by the end of the meal so it can't have been that bad!


To make a peach tart for a bunch of hungry teenagers, first make a delicious sweet pastry, I'm sure you have your favourite recipe, I like mine rich in butter, sugar and maybe some ground almonds.

If you are feeling like a saint, you'll blind-bake your pastry base.  This is a good investment of time, because the peach gets so juicy, if the pastry isn't pre-cooked, it will just go soggy.


While the pastry is in the oven, pour yourself a glass of wine, press PLAY on anything by Bob Marley and wash and slice your peaches.  I don't even skin them, because the fruit looks prettier with the skin still on (even if you go for this year's fashionable char-grilled look !!)

Take the pastry out of the oven , choose another CD,  sprinkle a little sugar over the base, quickly arrange the slices of peach, sprinkle more sugar and pop the whole lot into the oven.

Keep an eye on the tart  because there is a danger of it - ahem - caramelising.  I'd say about half a CD and two glasses of wine and the tart will be done!

Voilà  - I hope you also have some happy carefree moments to remember from the summer.  Thank you for reading me!


  • Digg
  • Del.icio.us
  • StumbleUpon
  • Reddit
  • RSS
Post Icon

blackberry and mint sorbet


via


Our blackberries are beginning to fruit, and before I start into the real jam season, I love to play around with desserts.  Crumbles obviously are high on the list, blackberry and apple, or blackberry with other red fruit  YUMM....


via


 But this year, I wanted to be a little braver and have started making the most wonderful black berry and mint sorbet.  This has been devoured here several times over the last fortnight, but each time I forgot or missed the moment for pictures, so these shots are borrowed from Google. (thank you!)


via


To make enough sorbet for 6 people, I first freeze about 6 cups of fresh blackberries.

Then I make a light syrup using 1/2 cup of sugar and 1/2 cup of water.    I drop a couple of handfuls of fresh mint into the pan containing the sugar and water, and bring everything to a boil.  As soon as it boils, I turn off the heat and let the syrup cool down.  This step could easily be done the day before.

I am also informed that lavender works very well in the place of mint.

When ready I strain out the mint leaves and pour the delicious smelling syrup into a shallow tray, and pop it in to the freezer.

The next step depends on whether you have an ice cream maker, and also how smooth a texture you wish the sorbet to be.

 For a reason I have yet to understand, I do not have an ice cream or sorbet machine. 

 I am also happy to have a little fruit texture in the sorbet.


via


I therefore pop the frozen berries and almost frozen syrup into a blender and whizz away for a few minutes.  When I think it is blended enough, I pour the mix into a deep tray and return to the deep freeze.  Every 30 minutes I remove the tray and stir it well with a large spoon.  After four stirs I declare my sorbet 'done' and leave it in peace in the deep freeze until we are ready to scoop out tasteful little balls of sorbet into tiny bowls.  Add a couple of fresh berries for decoration, and a snippet from a passing mint leaf and I am in business.

I'm telling you: this is a breeze, and  -  providing nobody spills sorbet down their new white linen trousers (let's not go there !)  -  it is a dessert that is generally acclaimed by all and sundry.

One day, when I grow up, I shall attempt this rather wonderful looking swirly combination of blackberry sorbet and vanilla ice cream, and that really would impress!


via


  • Digg
  • Del.icio.us
  • StumbleUpon
  • Reddit
  • RSS
Post Icon

deep fried zucchini flowers or beignets de courgettes


When the potager is producing baskets of courgettes or zucchini, and the weather is fine, my family love to see beignets de fleurs de courgette, batter fried zucchini flowers on their plates.


This is another of those simple family favourites, easy to put together that I favour so much, especially at this time of year when I never know how many people will turn up for lunch or dinner!


To make about 15 batter fried zucchini flowers, first find your flowers!  If you have a potager, then pick the flowers first thing in the morning.  Otherwise find yourself a good supplier who can produce fresh flowers.


The batter is pretty easy to make.  You will need:

oil for frying
200 gram or 1 1/2 cups of flour
3 eggs
20 g or 2 tablespoons of dried bakers yeast
glass of warm water 
salt and pepper


Dissolve the dried bakers yeast in the glass of warm water.  Put the flour into a large mixing bowl, add salt and pepper and drop the eggs in to the centre.  Using a whisk, start to mix the eggs into the flour, then add the dissolved yeast and beat well until totally combined.

Leave the batter to rest for an hour.

Check the flowers to make sure they are clean and remove the central pistil, and cut the stalk off fairly short.

The battered courgettes are best eaten hot, so don't start cooking until shortly before your meal.

Heat the oil in a deep pan.  Gently dip each flower onto the surface of the  batter, rolling it a little, so that the flower is well covered.  Lift and place carefully into the bubbling oil.   Repeat for all the flowers, turning them over so they are golden brown on all sides.

Before serving, lay the flowers on absorbent paper for a few minutes to take away any excess oil.  Once on the serving dish, sprinkle with a little salt.


If you find yourself with more batter than required for the flowers, simply slice a couple of zucchini, coat them in the batter and deep fry them too.  

I even use my last drops of batter to deep fry sage leaves, fantastic nibbles with a glass of wine!

bon appetit!


All pictures thanks to Google images


  • Digg
  • Del.icio.us
  • StumbleUpon
  • Reddit
  • RSS
Post Icon

strawberries and cream


Strawberries and cream - three little words that evoke summer, in all its deliciousness

Last week we were invited to a big lunch party, where the hostess was happy to accept some contributions for dessert.  We were eating outside, milling around, fairly casual, so I thought that  individual desserts could be the way to go.


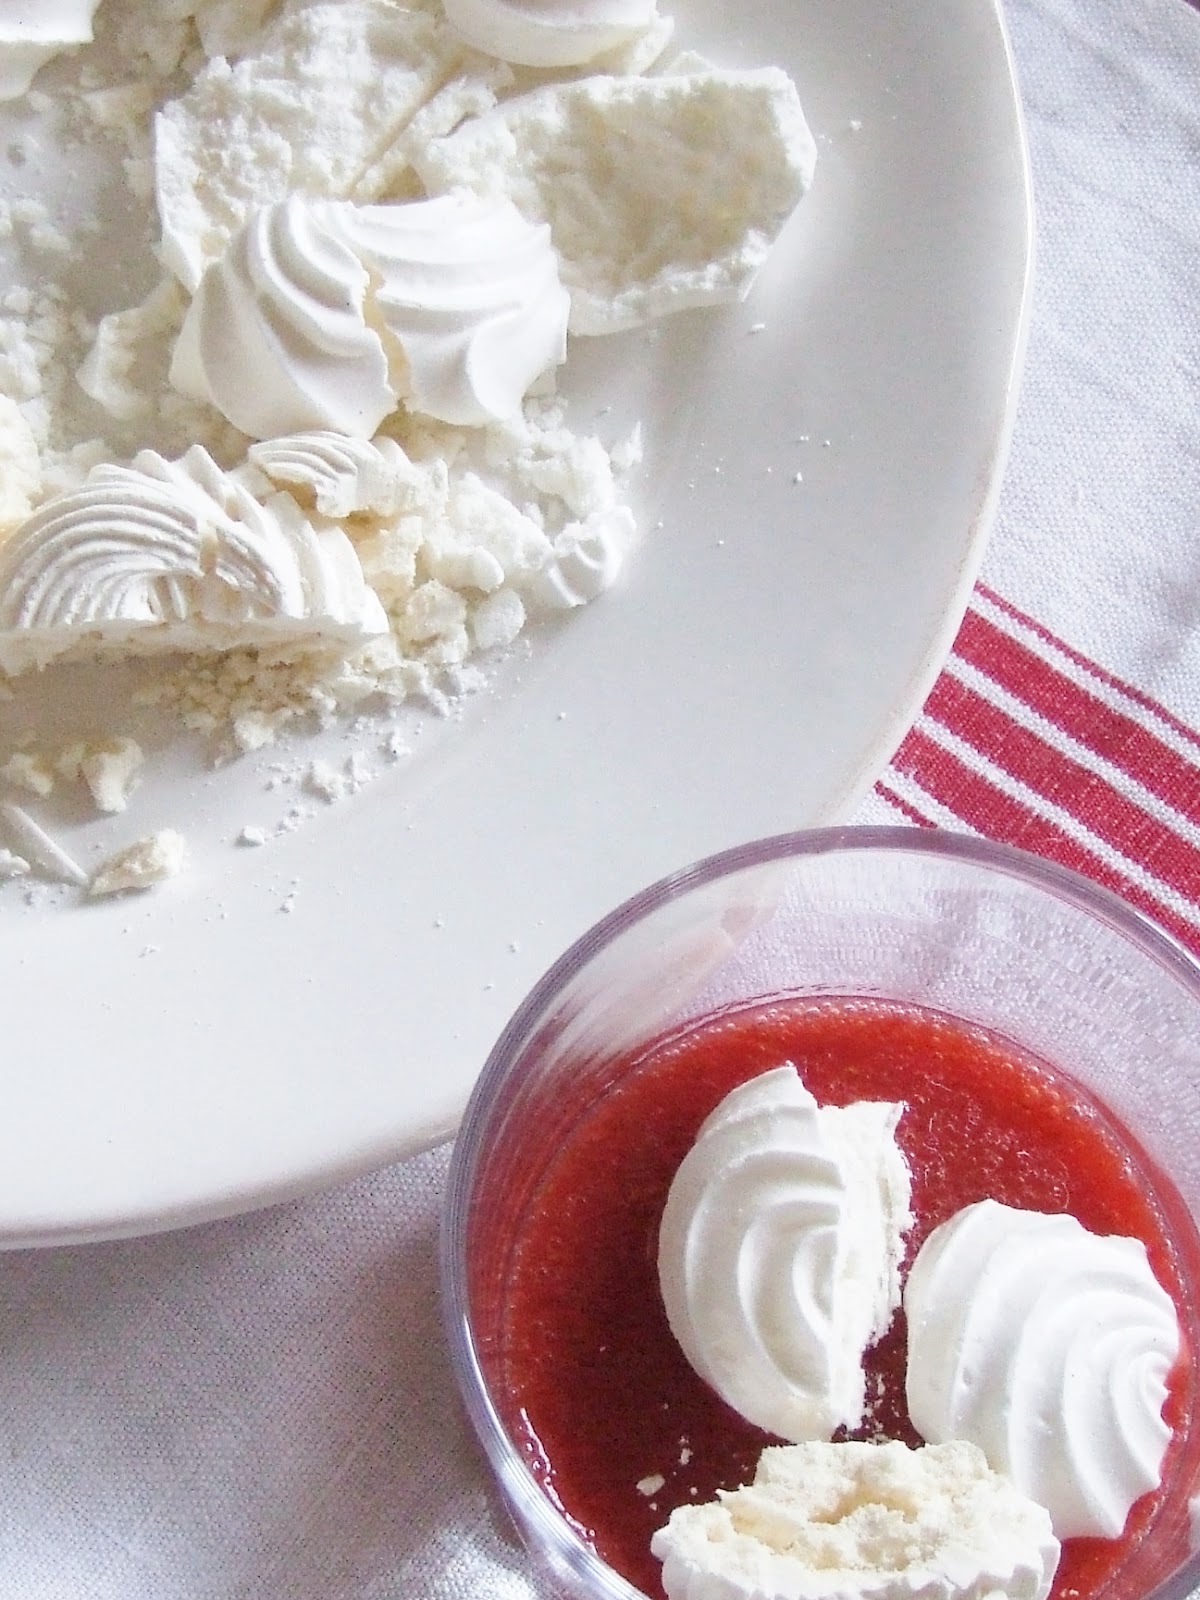
I put together these little 'verrines'  (French for mini portions in glass tumblers).  They could not be simpler,  all you need is fresh strawberries, whipping cream, tiny meringues and a sprinkling of sugar.

Having washed and hulled the strawberries, I took a handful and blended them in a bowl with some sugar to taste.  This makes the  fresh coulis that gives a pop of colour at the base of the verrine.   Of the remaining strawberries, some were left whole and some were sliced.


I beat the whipping cream until it would hold in soft peaks.  My meringues came from our local baker, who sells his home baked meringues in small packets, and they are so pretty and regular in their size and shape that I don't see the point in making them myself.  For this dessert, some meringues are left whole to decorate and the rest are cut or broken into pieces.


To assemble the verrines, simply pour a little coulis into the base of the glass, followed by some broken meringue.   Carefully spoon in some whipped cream, then a few slices of strawberries.  Another dollop of cream, a final spoonful of coulis, a beautiful little strawberry and a perfect meringue sitting on the top and you are done!   

These can be made ahead of time, they'll sit in the fridge quite happily for hours before your meal, they could even be made the day before if you are pushed for time.


So when it came to bringing my dessert to our friends I decided to have some fun, they all looked so pretty in a row.  I laid them out on an old French teacloth, with a red monogram in the centre, to match the  strawberries.   The overflow of strawberries were piled into a small tureen from my collection, and I took them over with some roses cut from the garden just before we went.


What can I say?   I have such fun putting together a few pretties, especially when I can gift them to a friend.


I wish you all a wonderful weekend, whether you are at the height of a hot summer or heading into fall, may you find something lovely to share with a friend!


  • Digg
  • Del.icio.us
  • StumbleUpon
  • Reddit
  • RSS
Post Icon

cannelés - a sweet speciality from south west france


A couple of lovely readers have asked me about these tiny copper moulds,  that I found in the fair yesterday. They are quite old and were purpose made to bake the delicious Cannelés!


Before I go onto the recipe, your opinion please.  I bought a few of these, for me and for the store, but I can't decide whether to clean them all.  Of course they are clean inside, but do you prefer the tarnished patina look or do find the sheen of polished copper irresistible?! Thank you!


These little cakes are a speciality of South West France, Bordeaux in particular, and for many people they represent a summer pleasure, enjoyed while on holiday.

They have a slightly thick and caramelised crust but inside they are moist


Ingredients to make about 12 cannelés

- 1/2 litre (2 cups) milk
- 25 g butter (2 oz)
- 2 egg yolks
- 1 whole egg
- 250 g (1+1/4 cups) sugar
- 125 g flour (1 cup)
- 1teaspoon vanilla essence, or the grains of a whole vanilla pod in the milk
- 60 ml (1/4 cup) rum


Boil the milk (with the vanilla grains if you are using a pod) add the butter and leave to cool.
In a large bowl beat the egg yolks, the whole egg and the sugar.    Add the flour, mix well then little by little add the milk.  Add the rum, and the vanilla essence if using it.  The mixture should have the consistency of pancake batter.  Leave overnight in a bowl in the fridge.
Fill the moulds to 3/4 level.   Cook for 15 minutes at 450°F (250°C), then drop to 355°F (180°C) and cook for an hour.


via


Instead of making this size cannelés, you can also make mini versions which only need about 40 minutes to cook.
Turn them out while they are still hot and - if you have the will power! -  leave to cool before eating.


via


                                                                     bon appétit mes amis!


  • Digg
  • Del.icio.us
  • StumbleUpon
  • Reddit
  • RSS
Related Posts Plugin for WordPress, Blogger...

visitors map