Showing posts with label refashion. Show all posts
Post Icon

Shoe Refashions

Is it just me or when you see really cute shoes but don't want to pay that much money for it and pass it up? If you have been wanting to buy cute shoes and have some plain boring shoes in your closet you were thinking about getting rid of, this post might be for you!

I had a couple old pairs I haven't been wearing for a long time. The beige ones I found at 6pm for a really good deal. When I saw this online, I thought they looked nice, but when I opened the box I was really disappointed. The material used for the shoes looked cheap and somehow it looked... blah... I was going to return them. Check out the trio.


I decided to go through my scraps, beads and such to perform shoe surgery!

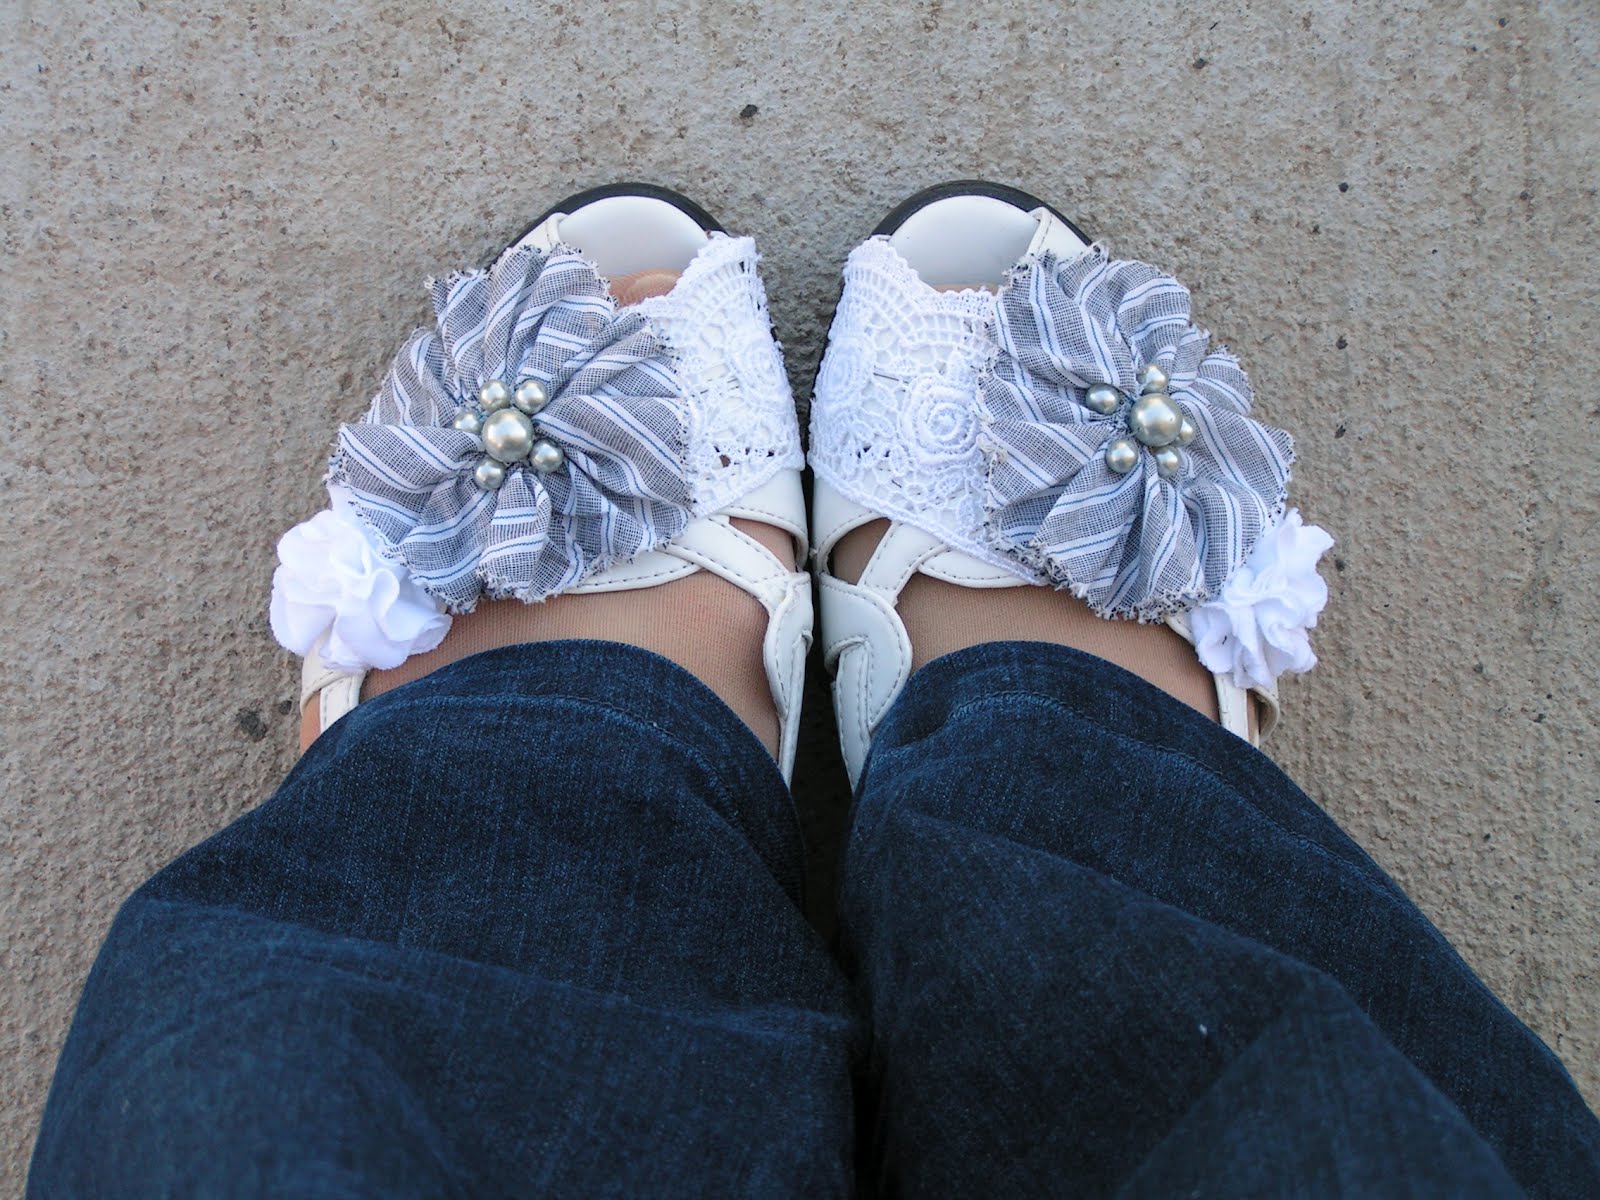
Case 1: White shoes

They weren't a bad pair, but for some reasons I didn't care for it that much... I wanted to give them some personality. Check them out after some lace and fabric flowers with beads in center.

Before...

After...


Case 2: Black shoes

Actually, these were my favorite pair at one point. It is very comfortable to wear, but the cotton fabric is starting to wear out. I guess that is why I stopped wearing them, other than that, it is still in good condition. I believe that with a little bit of a face lift, it will still be a great pair. I decided to make ruffles and rosette out my leftover black fabric strips to embellish them.

Before...

After...


Case 3: Beige shoes

I think this is my most favorite out of the three pairs after the makeover. I wanted to do something really different and fun. I added several colors and textures.

Before...


After...


I am so excited to have three pairs of (old) NEW shoes that I love… The best part? I didn't spend a dime to do these makeovers! As I mentioned my favorite is the last pair, and I have been wearing them a lot lately.


All you need for this project are old shoes, some scraps of fabric, lace, beads and such, fabric glue, and a little bit of imagination. Go fish in your closet, you might have some shoes to refashion. :)

  • Digg
  • Del.icio.us
  • StumbleUpon
  • Reddit
  • RSS
Post Icon

Tutorial ~ Sweater Refashion


I shared this sweater refashion at Me Sew Crazy last week. I am posting this here today just in case you missed it!


{You will need}

Sweater
Fabric
Laces, Ribbons and buttons
Matching thread

{How to}

1. Wear the sweater and decided how high you want the triangles to go. For example, just below the bust line or a few inches below the bust line. Also, mark the center with a pin.

2. I made a triangle template out of a cereal box and cut 8 triangles out of the fabric. The size of the triangles all depend on how long you cut into the sweater. If you want a more flared look, make sure that the triangle has a wide bottom. If you want a subtle flare, the triangle needs to have a narrow bottom.


3. Start making the cuts to the sweater. I made 8 cuts in all. In the center on the front and back, just to either side to those center cuts, and the sides of the sweater. They are about 4" apart, but you need to adjust that according to the width of the sweater. Just make sure that they are equal and well balanced.


4. Fold the bottom of the triangles and sew.


5. Sew the triangles to the sweater using a Serger or zigzag stitches.


6. Since the sweater was one size bigger than my size, I cut off some fabric from the sides and under the arm.


7. Pin, and sew the side. Make sure to sew in the fabric triangle to the sides at this step.


8. Make sure to mark the center of the neckline. I wanted the neckline to be slightly lower, so I drew the line and made the cut around the neck.


9. Make bias tape for the neckline. I cut mine 1 3/4" wide.


10. Sew the bias tape around the neck with zigzag stitches.


11. Start adding lace & ribbons between the triangles. Cut them to random lengths and seal the ends with fray check. Pin them in the desired places to check the balance and sew.


12. I didn't care for the long sleeves, so I cut them... I made the cut at the ribbed part, and took 6" off.


13. Sew the ribbed part back to the sleeves. I made it into 3/4 sleeves.


14. I thought it was a little bare around the neck, so I decided to decorate a little.

I made some yo-yo's, leaves, and flowers out of lace. Pinned all the embellishments onto the sweater to decide where I wanted everything.


* Sizing for the embellishments

* Yo-yo's: (S) cut 1 1/2"circles, (L) 2 1/2" circles (here is the link to how to make yo-yo's)

* Leaves: use 3/8" wide velvet ribbon. Cut 2" and fold it in half and lay both ends together and sew.

* Lace flowers: (I used 5/8" wide lace.) Cut a piece 5" long and gather the top and make a flower.

15. I wanted a little something at the back of the neck too. So, I added a tag with ribbon.


It is all done. All I needed to do was to try it on...


LOOVE it!


See you at next post!

  • Digg
  • Del.icio.us
  • StumbleUpon
  • Reddit
  • RSS
Post Icon

Tutorial ~ She Wears Flowers

A few weeks ago, I did a guest post for Tatertots and Jello and shared this tutorial. In case you missed it, I am posting this on my blog today. Enjoy! :)

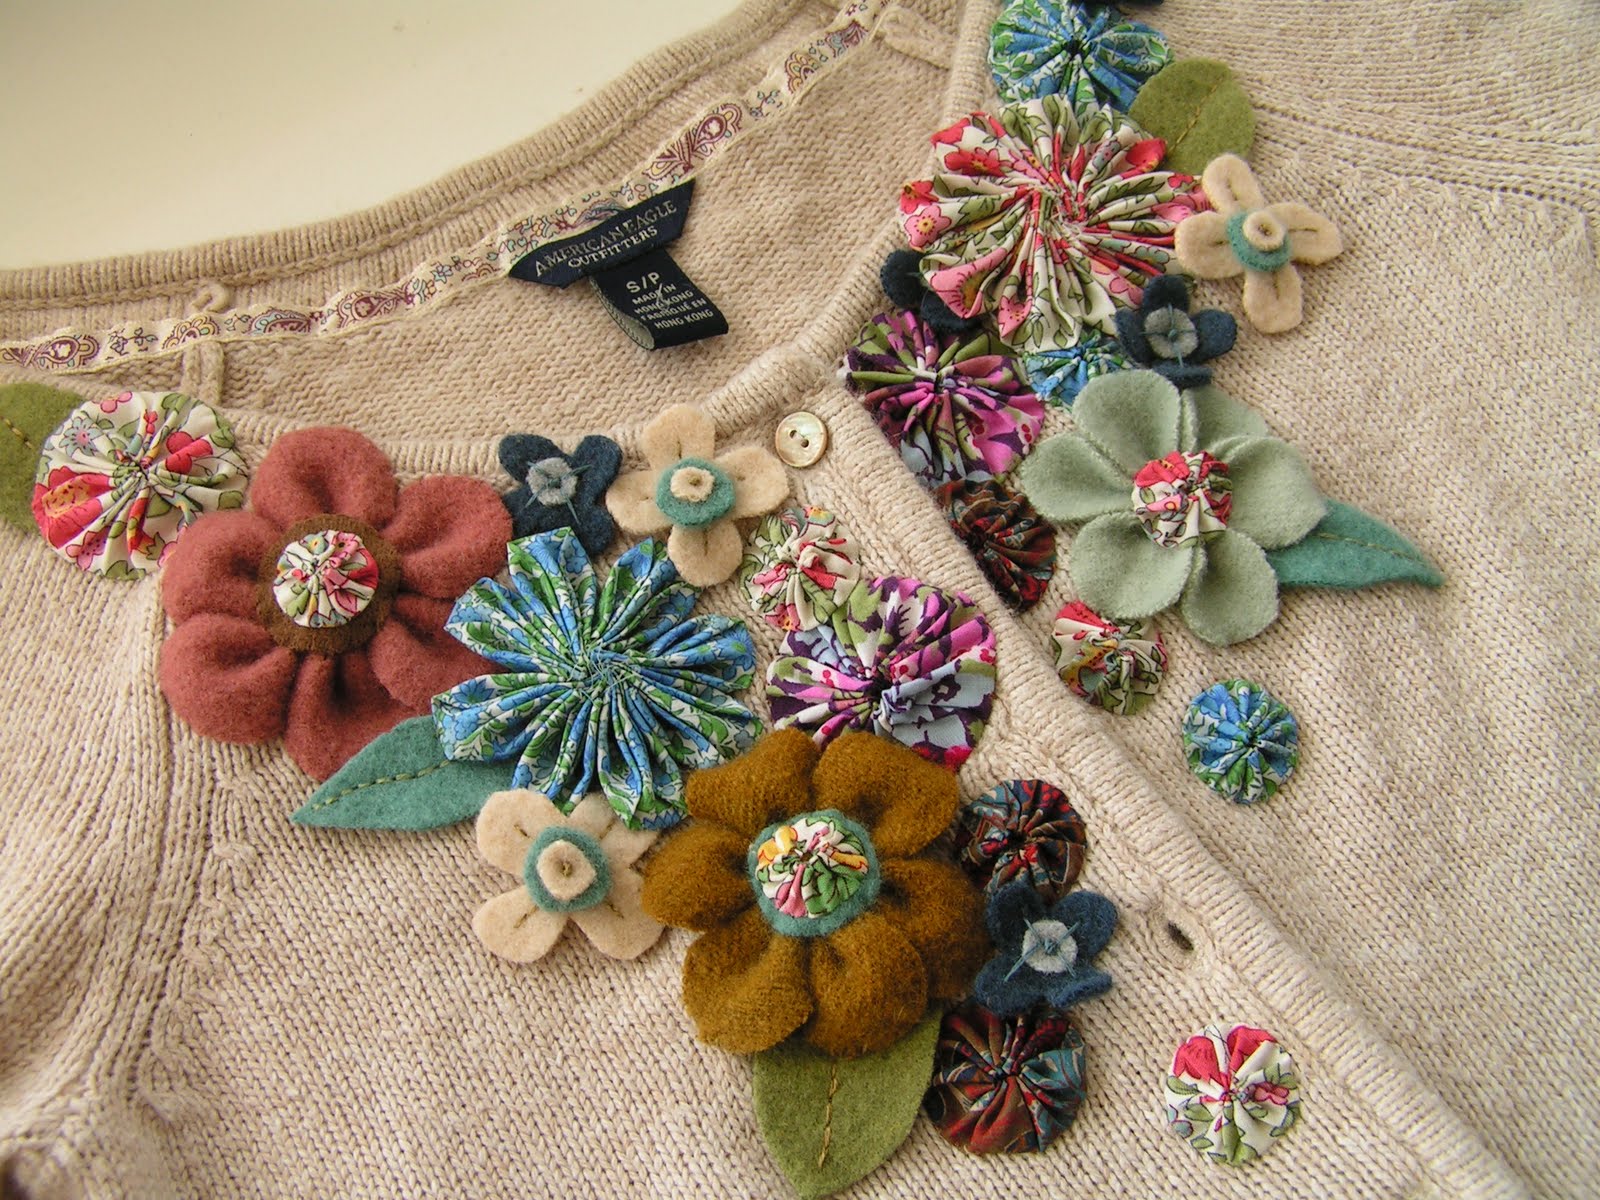
I am sharing a cardigan refashion today. If you have some old cardigans in your closet that needs a little facelift; then, this tutorial is perfect for you!


This is one of my favorite cardigans; I wore it for several years. I love the 3/4 sleeve, the open neckline, and the color... but I had this idea in my head to change the look of it, and I really wanted to give it a try.


{You will need}

A cardigan

100% cotton fabric that would match the cardigan (it doesn't need to be the same color, but it needs to either blend in with the cardigan, or have contrast and match with the flowers that you will accessorize the cardigan with)

Various fabrics, wool, and buttons

Matching thread

{How to}

{Assembly for the cardigan}


1. To make the bottom part, I cut the fabric like I am making bias tape. I used 36"wide muslin. Make a large square, fold it in half vertically. Cut 4 1/2" strips.


2. Piece them together. Fold the bottom less than 1/4" twice and saw.


3. Sew the top with largest stitch setting on your sewing machine. Pull the thread to gather the fabric. For this cardigan I didn't want lots of ruffles, so just a little to have flare. :) The bottom of the cardigan measured 30"all around, so I used 45" long bias and shrank to 30" long.


4. Pin the bias ruffle all around the bottom of the cardigan. I used zigzag stitches to sew it on. Fold the ends and zigzag to finish it off.


5. Add wide lace little bit above the fabric ruffle using the same technique as step 3 and 4.


6. I wanted to give more interest to the back, so I added a second row of lace ruffle. I cut 14 1/2" lace, and folded the both ends and zigzagged them prevent fraying, made a ruffle and added it in the back.


7. Cut 1 3/4" x 6 1/2" lace, and sew it on the waist line too. Make sure to center it so that both step 6 and 7 line up nicely.


8. For the sleeves, mine was 8 1/2" around. I cut 14" long lace and sewed the ends together, zigzag the ends to prevent fraying. Using the same technique as step 3 and 4, make ruffles and sew it on the bottom of the sleeve. Do the same to the other sleeve.


{How to make flowers and Yo-yo's}

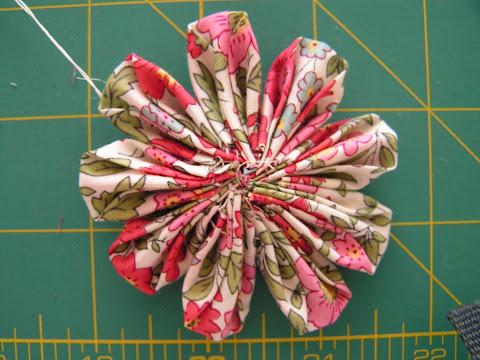
*Folded fabric flower
1. Cut 8 - 3" x 3"squares and fold the squares according to the picture.


2. Using two strands of threads, put through each petal, don't forget cut off the excess.


3. Tie the ends to form a circle to make a flower. I like to sew each petal to each other to secure them.


*leaves
Cut 1" x 2" rectangle first, and trim them so they look like leaves. They don't have to be perfectly unified.


*Flat flowers
Cut 1 1/4" x 1 1/4" square and trim it so that it will have four petals. Cut small circles for the middle.


*Felt flower (Light green)
1. Cut 6 - 1" x 2". Trim them so that they have round top.


2. Fold the bottom in half and pull them through the thread to make a flower. I stitched them together several times to secure them better.


*Felt flower (muted pink)
1. Cut 6 - 1" x 1 1/4" rectangles, trim them so that they will have rounded top.
2. Using the same method from step 2 on felt flower (purple), make the flower.
3. Cut circle for the middle and sew.
4. Sew yo-yo on top of the small felt circle


*Yo-yo

I used 3" and 2" circles to make yo-yo's. Smaller ones on the felt flowers are made with 1 1/4" circles. If you need to see how to make yo-yo, you can go to my tutorial.

{Assemble}


In my opinion, this is the most fun part. Just lay down the cardigan and lay down the flowers and yo-yo's to see what you can come up with! It is better to deiced where you want to bigger pieces go first than diced on smaller ones.
Pin them to see if you like the lay out. If you do, it is time to stitch them onto the cardigan.

I used some DMC floss to do fun stitches on the flowers and leaves. I did lots of slip stitches around the yo-yo's.

After you are all done with above, you can add buttons and such.

I had lots of fun making this, but wearing it was even more fun.


Why I am smiling? I have other ideas that I can't wait to try with more fabric and wool flowers, thinking about the possibilities makes me so excited!


I LOVE how it turned out! It will be fun to have some colors under the fall & winter gloomy sky; it is one of my ways to brighten up the day a little. :)
NOTE: Since I am having another procedure this week, the link party is cancelled. Sorry.

  • Digg
  • Del.icio.us
  • StumbleUpon
  • Reddit
  • RSS
Related Posts Plugin for WordPress, Blogger...

visitors map