Post Icon

quick and easy headboard change

over the weekend i pulled out my stash of domino magazines.  i love looking through them every now and then just to see what i can find that i haven’t noticed before.  i find that as time goes by i notice different details in the articles and pictures.  sometimes it’s a light fixture; other times it’s a particular color. 

this time i noticed a great way to make an easy change to a headboard.  domino did a article in their june/july ‘08 issue about stephen elrod, vice president of design for lee jofa, and his seaside cottage.  the “new to me” element in the home was the layering of throws on top of headboards in two of the bedrooms.

although i’m not crazy about the fabrics he used i do love the idea.

i thought i’d throw out some ideas of how i would pair the two.

for an upholstered look i would pair this thomas paul print slipcovered headboard with a gray chunky tassel throw from west elm.

Skyline Furniture Slipcover Headboard in Gerber SungoldChunky Tassel Throw

for a seagrass look similar to the headboard in the second photo i would pair this pier 1 headboard and a suzani overlay from wisteria.

Sea Grass Block Queen Headboardimages/W3934-large.jpg

and for a darker option i like the pier one chocolate seagrass headboard with the ws home zebra stripe throw.

Rope Queen HeadboardSafari Printed Cashmere Throws

another great and inexpensive way to achieve this look would be to purchase a fabric remnant at your local fabric store.  once you hem the edges or use stich witchery then you could just drape it over your headboard. 

hope you all had a great long weekend.  i sure did!

  • Digg
  • Del.icio.us
  • StumbleUpon
  • Reddit
  • RSS
Post Icon

Link Love #9!

For this link party, I had over 100 links, thank you so much for your participation! I went and visited all the links but I could not leave comments to everyone of you, I am sorry!

There is something really exciting happening at Tea Rose Home, over the next several months, but I can't share the details with you yet... because of them I have been swamped with many things and deadlines (because of my procedure and recovery, I couldn't do much for a week!) I had less computer time than usual.

I chose several creations to spotlight for today's link love.

Take a look at this beautiful Butterfly Lamp. Isn't this gorgeous? Very delicate, yet very colorful and fun, I just love to look at it.


I found another craft blogger who creats beautiful things! Princy n Paris shares how to make this sweet apron for a little girl on her blog. I love the details she added.


Happiness is 5ive shared picture of her entryway she finished. I love how she used the things she already had and made the entryway such a warm and inviting space.


Kristabell Burgeoning made an amazingly cute Toddler Cardigan. I made something similar to this when my first child was born, but her's are way better than mine.


House of Smith shared her Hall Way Sign. It turned out so cute! While I was visiting her blog, I saw other parts of her house, looks like she is one talented decorater too!


Adventures in Dress Making shared this clever tutorial. Using her collection of vintage handkerchiefs and accesorized plain tank. So creative!

And...I have a special category this time...I know Tea Rose Home is more geared towards, feminine, romantic, and ruffly stuff... BUT, there are other parts of me; fun loving jokester and a mother raising two rowdy boys.

I couldn't help but to post these two links that made me smile.

I named the category "Got Boys?"

You need to check this out, this is one cute t-shirt, don't you agree?


Monster Tissue Holder. My boys wouldn't care for my tissue holder, but I know they will definately LOVE this one.


Thank you sharing your creations and talents everyone!

  • Digg
  • Del.icio.us
  • StumbleUpon
  • Reddit
  • RSS
Post Icon

A Day at the Market

I hope you all are enjoying this wonderful holiday weekend - we sure are!  I just wanted to share some pictures from our trip to our local farmer's market.


Check out these hanging baskets - aren't they GORGEOUS!  I would love to have one, but we don't have anywhere to hang something like that.  So if you can't take one home, you might as well stop and smell the pretty flowers.

During this time of year there is very little produce available at our market.  It's mostly plants, herbs, cheese, honey, bread and wine.  Asparagus is in season right now, but that's about it.  In a couple months the market will transform into more of a vegetable and fruit market.

Here's Miss Savannah taking a stroll through the central square - she is quite the little independent 2-year old these days.

It was gorgeous weather outside and Savannah was loving it.  She is wearing a dress I made for her from the "Sienna" dress pattern by Lil Blue Boo.  The dress is made entirely from recycled knit shirts and only cost $1.00!

Matilda was having fun too - this is her "I'm so happy, I might explode face".  I made her a coordinating dress also!

The girls have been getting along great - I feel very blessed that Savannah has yet to show any jealousy towards her baby sister.  I'm sure there will be ups and downs, but I really hope that they will grow up to be good friends!  It just melts my heart when Savannah puts her arm around Matilda and says "best friend" - so sweet!

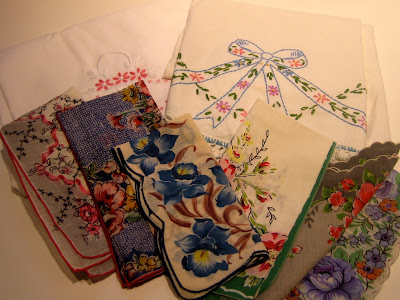
On our way home from the farmer's market we stopped at one of my favorite antique shops and here's some of the treasure I found:

A couple of vintage embroidered pillowcases (which will be made into girls pillowcase dresses) and a bunch of really beautiful vintage handkerchiefs.  I've got some projects in mind for the hankies so there may be another tutorial using these in the near future.

Anyway, I just wanted to share what we've been up to this weekend.  
What have you all been up to?  
Anyone doing anything fun?

  • Digg
  • Del.icio.us
  • StumbleUpon
  • Reddit
  • RSS
Post Icon

Basement Bathroom

I received a nice surprise yesterday. A friend called to tell me she had seen my basement bathroom in Real-Life Kitchen and Baths – a special interest magazine by Meredith publications.

Real-Life Kitchen and Baths / Photographer - Bryan McCay
Stylist - Donna Talley, Regional Editor and Producer for Meredith Publications

For those of you who have been followers for a while, you might recognize this story as a rerun of an article which appeared in the winter 2009 edition of Better Homes and Gardens’ Kitchen and Bath Makeovers.

Real-Life Kitchen and Baths

Real-Life Kitchen and Baths / Photographer - Bryan McCay
Stylist - Donna Talley, Regional Editor and Producer for Meredith Publications

This bathroom was part of an overall basement remodel which also included a sitting area, bedroom and storage.

Better Homes and Gardens / Photographer - John Bessler
Stylist - Donna Talley, Regional Editor and Producer for Meredith Publications


Better Homes and Gardens /  Photographer - John Bessler
Stylist - Donna Talley, Regional Editor and Producer for Meredith Publications

We wanted a space which would be suitable for guests as well as serve the needs of our family. Although this bathroom is a fairly small space, we took our time planning out every detail. We began by listing everything we wanted, regardless of cost.

Real-Life Kitchen and Baths

Real-Life Kitchen and Baths / Photographer - Bryan McCay
Stylist - Donna Talley, Regional Editor and Producer for Meredith Publications

This helped us decide what was most important and where we could save money. One of the compromises we made was the shower. Our first choice was a tiled shower, complete with glass doors. Because this is a guest bathroom, we opted instead for a shower insert surrounded by tile and a shower curtain I made from Amy Butler fabric and quilting fabric.

Real-Life Kitchen and Baths

Real-Life Kitchen and Baths

We also stayed on budget by purchasing the hexagon marble floor tiles from Ebay and the towel bar, faucet, and medicine cabinet on sale from Restoration Hardware.

Real-Life Kitchen and Baths / Photographer - Bryan McCay
Stylist - Donna Talley - Regional Editor and Producer for Meredith Publications

Real-Life Kitchen and Baths / Photographer - Bryan McCay
Stylist - Donna Talley, Regional Editor and Producer for Meredith Publications

Overall, we have remained very pleased with our choices. Our family and friends seem to always ask if they can stay longer the next time they come. I guess this means all our patience and planning were well worth the effort!

  • Digg
  • Del.icio.us
  • StumbleUpon
  • Reddit
  • RSS
Post Icon

Summer Fabric Rag Wreath Tutorial


I have had my spring wreath on the door since, well, the beginning of spring.  I kind of felt like it was time for something new.  I wanted to create a summer wreath for our front door that would be fun and cute, but would break the budget.  So here's what I came up with.......

Summer Fabric Rag Wreath Tutorial

Supplies:
1 wreath form (whatever size you like)
Scraps of fabric (10-12" long)
1 piece ribbon or other material for hanging
Scissors

Directions:
This is a medium sized wreath that I bought from the dollar store, so it was only $1.00 (woohoo!!)


Pull out your scrap bin to find the fabric for your wreath.  This is my "Nicey Jane" scrap bin (I like my scraps to be arranged by fabric line).  I LOVE Heather Bailey's "Nicey Jane".........it just exudes summer!


Cut your fabric scraps into 10"-12" long strips for a medium wreath.  The length will depend on the size wreath you have chosen.  Use all different widths - I had some very skinny pieces and some pretty wide ones.  I like the variety of the different widths.

Now the fun part - just tie each strip on the wreath and tie it into a knot.  Push them very close to one another.  Do this until your entire wreath is covered in fabric strips.


This is what the front of the wreath will look like when it is complete.  Fluff all of the strips and make sure none of them got caught in the knots of the others.  Give the wreath, what I like to call a "haircut" if you feel the strips are too long.  Cut it down until the look is to your liking.


Here's what the back of the wreath will look like - which I think looks pretty also.

Now you will need ribbon or twill tape (which is what I used) to make the hanger for the wreath.

Cut whatever length you need depending on your door......mine was only 10" long.  Loop the ribbon around the wreath and tie a knot.  The knot will not be seen by all of the scraps on the wreath.  Place the knot down on the wreath.

Hang your new, fun summer fabric rag wreath on your front door.  Doesn't it look happy?


This is not the best picture, but you get the idea.  So I hope you will use your leftover scraps of fabric to make a summer rag wreath.  This really is one of the easiest projects I've ever done - no sewing, no gluing - just a little time.  This is also a great project to have the kids take part in too!

Happy Memorial Day Weekend!

  • Digg
  • Del.icio.us
  • StumbleUpon
  • Reddit
  • RSS
Related Posts Plugin for WordPress, Blogger...

visitors map