After the curtain hardware was painted and glazed for my living room makeover, it was on to the installation. As you will find from the tutorial below, this is a very simple project which even the most inexperienced DIYer can feel confident about tackling. Whether your brackets are wood (like the ones in this tutorial) or metal (like those pictured in my family room below), the process is the same.
Womans Day Budget Decorating
Photographer – Michael Portenio
Stylist - Donna Talley, Regional Editor and Producer for Meredith Publications
Tools:
Small level
DrillDrill bit
Screw driver
Hammer
Pencil
Stud finder
Background Information:
I prefer to hang curtain panels about 5 inches or more above the window molding and about 3 or 4 inches outside the width of the window - like the ones shown below in my daughter's bedroom.
.
By using these measurements, the window appears larger and the ceiling taller and less of the window is blocked by the curtains allowing for more natural light in the space. Of course, these guide lines are subject to change depending on the architecture of the room.
Procedure:
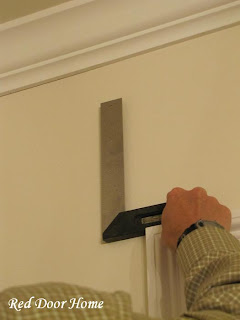
Measure the placement of the bracket using a small level.
As you can see from the photo above, the rod will be hanging 5” above the window but the height of the bottom of the bracket is lower.
It is important to use a level to keep the bracket plumb, i.e. straight up and down.
Once the bracket is in the correct position, use a pencil or screw to mark all four of the holes placements.
For wall anchors: Drill pilot holes for the plastic wall anchors using a drill bit slightly smaller than the wall anchor to allow for a snug fit. Tap wall anchors into place using a hammer. (I don’t have any pictures of this part, as we were lucky to find studs.)
Attach brackets to wall, through the bracket holes and into the wall anchors if necessary. Use a screw driver and the provided screws.
Gently tap in button caps with hammer to cover screw holes.
Note: I was a little disappointed to discover the brackets I purchased did not come with caps to cover the screws. It was an easy enough fix – 3/8” oak buttons from Lowe’s solved the problem – but I found it hard to believe they were not included with the brackets. To me, without the caps the brackets look unfinished.
Place curtain rings on rod (which I did not do before I took this picture - whoops!) and screw in finials to ends of poles. Place rod on brackets.
Now that the hardware is up it is time to find the fabric for the curtain panels. I have my choices narrowed down and will be sharing them soon.


0 comments:
Post a Comment