


The most-used bathroom in our house is probably the one on the main level. There are two nice bathrooms upstairs and one in the basement, but the convenient little half-bath is surely the most popular. And...it's the one any guests use.
Not exactly a recipe for success.
Several years ago I put up a nice textured wallpaper and a lighthouse border that I found at Lowe's. It wasn't expensive, and it was better than those plain white walls.


Like the way the kitchen dishtowel gets pressed into service as a hand towel? This is real life, folks!

Here's the big problem: every little kid who has sat on this toilet has been inexplicably drawn to the seam in the wallpaper.

Pick...Pick...Pick...
That section of the wallpaper has been put back together (like a jigsaw puzzle) on multiple occasions! (Thank you, Elmer's Glue.) After years of this, may I just say...
I am so over wallpaper.
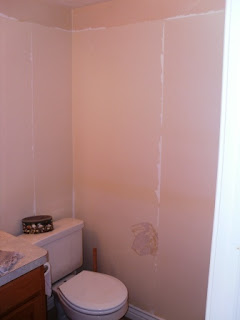
The top vinyl-y layer comes off in big sheets, leaving behind the paper backing and the adhesive. If you're planning on removing wallpaper, your next two best friends are these:So last weekend...I was bored.
What to do...what to do... I know!
Let's rip all the wallpaper out of the bathroom!So I did.


A squirt bottle and a plastic scraper (I use the kind kitchen stores like to give away).
Once all the paper was gone, I washed down the walls with TSP to remove any glue residue. I've never done that before, but it seemed like a good idea at the time!
Now...the paint! I bought a $5 gallon of "oops" paint from Lowes, and base-coated the whole bathroom in a nice creamy white.
But it needed a little pizzazz! So after much measuring and leveling, I marked out the wall for STRIPES!!
I measured the wall from the ceiling to the top of the baseboards, and divided it into 7 stripes, each 11.5 inches wide.

I placed the tape on the outside of the stripes I would be painting. Then, using a trick I have learned from Blogland, I quickly ran a roller with my base color over the inside edge of the tape (the edge that was going to be the new color). This seals the edge of the tape, and any bleeding that happens isn't noticeable, because it's the same color as the base coat!
Genius, I tell you; sheer genius!
The color for my stripes was a mix. I tried using the same tan color I have in the rest of my house (Martha Stewart Woven Flax--love it), but it seemed too dark. So I mixed some of the Woven Flax with my $5 paint and came up with a softer tan. Perfect.
So, without further ado, here is my newly striped bathroom!
 See? No more jigsaw puzzle next to the toilet!
Love the super-clean stripes. I had to do very little touching-up.

Not bad for a $5 paint job, don't you think?
Still to come: a frame for the mirror, new light fixture, painting the vanity (I think), and the frou-frou!
 |  |  |
 |  |


0 comments:
Post a Comment