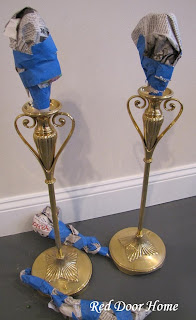
This pair of brass lamps has been waiting patiently for several months for a makeover. With the weather cooperating this weekend, I finally got the chance to paint!
My list of supplies was short – spray paint, glaze, newspaper, sanding block, cardboard, paper towels, and painting tape. I decided to go with white instead of using the more popular oiled rub bronze (ORB) finish I have been seeing everywhere.
Lamps ready to be painted – lightly sanded and everything that should not be painted covered.My painting studio – snow still on the ground but at least the sun was shining!
To paint the finials, I put a long nail in the cardboard and then placed the finial on top. This allowed me to paint the entire finial including the bottom.
Here is a close up view of the lamps after they were glazed. I simply applied the glaze using a paper towel, adding layers until I achieved the desired finish.
Now for some lamp shade choices.
Option number 1
Here is what one lamp looks like - painted and with the original shade. Very pretty!
Option number 2
Then I started thinking. After putting the original shades back on the lamps I was not sure if they were "too white." I wanted to add some texture to the shades but not spend any additional money. My solution - a simple burlap lamp shade slip cover. (directions on how to make this are below)
So, which shade do you like better? As I plan on using both lamps in this space, I would love to hear your opinion! Either way, I am very pleased with the outcome of this simple project.
Lamp Shade Slipcover Tutorial
Materials: Burlap, Coordinating thread, ¼”Ribbon, Safety Pin
Measure height and bottom circumference of lamp shade. Add 5” to the circumference measurement and 2” to the height measurement.
Use a finished edge of the burlap as the bottom edge of your piece of fabric. Cut piece of burlap according to above measurements. To help prevent fraying, sew 1/4” seam allowance along three unfinished sides.
Press side seams under ½” with iron and sew using a ¼” seam allowance. Press top seam under 1 ¼” with iron and sew 1” down from folded edge. This will form a pocket.
Cut piece of ribbon a few inches longer than fabric. Attach safety pin to one end of ribbon and pull gently through pocket. Slightly gather top by pulling ribbon ends.
Align gathered top with top of lampshade. Pull ribbons tight, adjusting gathers so they are evenly distributed around entire slip cover. Tie ribbon in bow.


0 comments:
Post a Comment