I found these t-shirts at Target the other day, they were $5 each. When I tried them on, they fit perfectly and I loved the color! I just wanted to add some personal touches to my spring wardrobe. I was thinking about all the other options, then one of my previous posts crossed my mind. I love the shirt and I wear it ALL THE TIME! It is perfect underneath a cardigan. I wanted to do something different this time though... well, why not a vertical ruffle shirt!
{How To}
1. Cut one of the t-shirts along the seam line. To have longer strips, I used the back of the shirt for the ruffles.
2. cut 3 - 2 1/2" strips and 3 - 1 3/4" strips. My shirt was xs, if you are working with a larger shirt, you can cut the strips wider or make more rows.
3. Lay 1 3/4" strips on top of the 2 1/2" strips. Make sure that the top strips are in the middle.
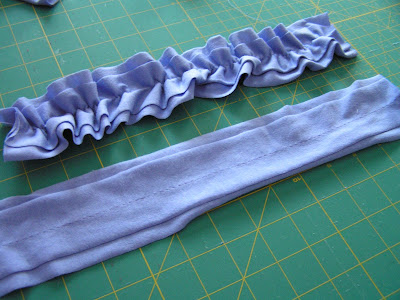
4. Cut several inches off of two of the strip sets, these will be your side ruffles. (I cut 6" off, you may want to do more or less.) You will have 2 - 18" long strip sets and 1 - 24" long strip.
5. Using your largest stitch, sew in the middle of the strips. Pull on one of the thread to gather the fabric to make ruffles. Remember, there are other methods to make ruffles, do whatever method you are comfortable with.
6. Fold the t-shirt in half and make a crease in the middle. Pin the longest ruffle set in the middle of the shirt. Sew the ruffle by using a regular stitch.
7. Do the same with the two other ruffle strips. Lay them right next to the middle ruffle. Once you wash the shirt, there will be more space in between the ruffles.
It was little chilly outside, but I enjoyed the shirt. I can't wait for Spring to come!
Tutorial~Ruffle shirt~ Why Not Vertical
Subscribe to:
Post Comments (Atom)


0 comments:
Post a Comment