Looks like so many of you have been busy during the last week as well! There were 135 links to go through and that is our link party record. Thank you so much for participating in my link party everyone!
There are many of them that I liked but I had to choose a few to spot light for this week...
Dots and Stripes made these adorable baby shoes by using Debbie Bliss's quick baby knits pattern. Aren't they so cute? They will be perfect for coming up seasons.
Check this out. This eye chart was created by She Wears flowers. I thought this would make a fun and unique gift and decore for homes. She shares how she made it in her post.
Sarah from Welcome to the Good Life shares how she made this pretty necklace inspired by Anthro. I like her version much better to tell you the truth. Great job!
These adorable twin aprons are made by en ØBY ting. I can't understand a word on her blog, but she has lots of inspiring pictures. I love the fabrics she used for this project!
I couldn't resist picking this one... Scraps N'Strings shares her tutorial how to make this irresistable Tag-a-long Lion. It looks so simple and easy to make, and the results are awesome! My boys love to read Calvin and Hobbs, and I know Hobbs is a tiger, but this lion reminded of me that comic. 
Thank you so much everyone for sharing your talents in my link party! Happy creating. :)
Link Love No.17
Retro - but updated
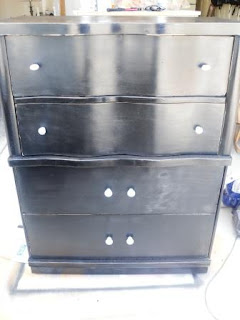
It's not always about "shabby chic" or "farmhouse chic," although I will admit I have a very soft spot in my heart for both! But a few weeks ago, I found a dresser and a chest of drawers within a day of each other, one at DI and one at a garage sale! The price was right, so they had to come home with me.
I am LOUSY at remembering to take "before" pictures, so you'll just have to trust me that the finish was flaky, and the hardware was that yucky brassy/gold color. The dresser had a darker reddish finish, while the chest of drawers was almost blond. However, they both had some pretty curved drawers, so I thought they would look great as a set.
Not sure why the third drawer looks so smudgy. That could be fingerprints from a two-year-old.

A lovely couple came to look at them, and decided they wanted to buy both pieces. They had to leave to borrow a truck, which they did--but the truck didn't come with any tie-straps, or blankets, or nothin'. No blankets meant you didn't exactly want to lay these down and risk getting them scratched up on the bed of the truck. No tie straps meant they (especially the chest of drawers), were more than a little unstable. I, unfortunately, didn't have a thing to offer them for rope or anything--I use a minivan to haul my stuff around!
Well, they put both pieces upright into the back of the truck. , and they were sure they would be fine--and off they drove. About 10 minutes later, I got a call from my neighbor on the corner.
Him: "Did you sell those black pieces that were in your garage?"
Me: "Yes."
Him: "Well, I didn't see exactly what happened...but they didn't make it around my corner. I heard the crash."
Me: "Augghh!!"
(That's the condensed conversation.)
We both agree that the chest of drawers had to have flipped out of the truck. The couple never called me to tell me what happened. I'm not sure what I could have/should have/would have done if they had. I *am* glad I never saw the destruction myself--that would have been too painful after all my hard work! I can only hope that MAYBE it was salvageable (although my friend who heard the crash has doubts that it could be), and I definitely hope that the dresser survived unscathed.
But I feel bad for them!


It's not easy being green...
In fact, it's sometimes just plain horrifying! That's what I thought when I first saw this buffet at a garage sale a couple of weeks ago...
What do you think?
First item of business was to strip the top down to bare wood. This was my first trial of my new orbital sander, and I was in love!! Power tools...where have you been all my life?? Anyway, the big surprise was that there was CHERRY wood underneath! What a nice surprise! The drawers were all cherry, too--which I discovered after stripping out the orange and green 60s wallpaper! (I so wish I had taken a picture of that!)
This buffet sat around in partial nakedness while I worked on other projects. Last week, though, a lady visited my garage to look at another piece I had for sale, and cupid struck! She fell in love with Kermit (what else do you call a green buffet?).
She wanted a classic black with a wood top. Here are the results:
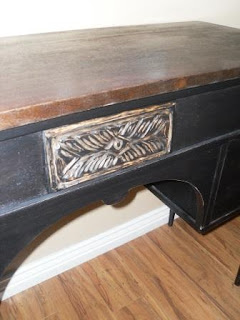
The bottom got painted flat black, then I glazed it with burnt umber to give it a more "aged" appearance. I finished it with several coats of hand-rubbed satin polyacrylic.
I didn't do too much other distressing, other than in the carvings. I wanted them to take center stage!
The lady wanted a fairly dark top, but with some hint of the red from the cherry wood showing through. I put on a walnut stain, and I was amazed at how quick it was soaking up the color! I was wiping it off about as fast as I was putting it on, but I think I ended up with pretty good results.
I wish my photography skills were better! Originally we had talked about the center panel being stained like the top, but that didn't look right. You see, these pressed panels are made out of a softer wood (like pine), and it took the stain differently than the top. It just looked dull. So I ended up painting it black and then sanding out the details like I did on the legs.
Here's one more gratuitous "after" shot!
I hope Kermit is happy in his new home!
Linking up:


Show and Tell: Gathered Ruffle Camera Strap Cover
Remember a month or so ago when I told you about my new baby (my new DSLR camera - Canon Rebel T1i)? Well, I have seen a gazillion cute camera straps around the internet lately and I thought "I want one!". So today I decided to make myself one for my new camera.
I've seen a lot of great tutorials, but nothing was exactly what I was looking for, so I just decided to go for it and make my up my own little design with a little inspiration from here and there.
I used fabric from designer Anna Maria Horner. When I was first introduced to this designer I was not initially won over by her work (sorry to say), but now I LOVE it! I guess it's grown on me - I love the eclectic mix of patterns she uses with vintage, geometrics and florals.
I used a piece of woven trim that I purchased at a very old local fabric store. I don't know if it is vintage or not, but it's old and I just loved its charm.
I wanted my camera strap to be slightly padded so I added some fusible fleece to the under-side. I'm very happy with the amount of padding this gives the strap cover - not too much, not too little.
I used a gathering stitch on the top layer (don't worry if you don't know what that means, I promise to cover that in my "Sew Basics" series) and stitched the ribbon down the center of the ruffle. I then sewed the top layer to the bottom layer (right-sides together) and turn it right-side out to reveal the completed camera strap cover.
On the inside I stitched in my label - The Cottage Mama. It's so fun to have your own labels! Even if you don't sell the things you make, I highly recommend purchasing some for any of the gifts you give or the clothes you make. I feel so proud when I see my girls wearing "The Cottage Mama".
And there's me - "hi there!" sporting my new, hip camera strap cover. I designed, cut, and finished this camera strap during naptime today, so it sewed up pretty quick. If you have a boring camera strap right now, why not take a little time to make yourself something special, I'm sure you deserve it!!
Chairs for the Farmhouse Table!
A couple of weeks ago I finished and sold my Pseudo-Farmhouse Table. The sweet lady who bought it asked me to finish three of her mis-matched chairs to coordinate with the table. Yay! But she really wanted to bring her total of chairs up to eight, so I have been watching DI and KSL.com for suitable chairs for her. As of today, I have finished six chairs for her, and the other two are waiting in my garage! The last two are arm chairs with padded seats, and I still need to get fabric for the new seat covers.
Here are some BEFORE pictures of the table and chairs!
These two chairs belonged to my friend originally. She bought them at an antique store several years ago.
The chair on the left is definitely a "modern" chair, but we figured once it was painted, distressed, and glazed, it would fit right in! The chair on the right is also a true antique--it has a date on the bottom of 1884!! We decided it would be a shame to paint this one, but it needed a lot of work (obviously). Besides a broken arm and back, a dog had chewed one of the front corners!
And here are some pictures of the beautiful AFTER:
Here is one of the chairs in closer detail. All of them were painted, then distressed and then glazed with walnut stain to match the table. It's hard to see in the picture, but the two antique chairs had pretty pressed backs, but they had almost worn away with time. Distressing and glazing them makes them stand out again.
She also has a beautiful buffet, but its back was broken about six years ago. She had the great idea to replace the back with beadboard, painted and glazed to match the chairs and table. It looks fabulous, and ties in so well now!
And here's a picture of the 1884 antique chair, all beautiful again! I can't take credit for this one! When it comes to the really hard jobs, I call on my good friend Michael to pull them off for me. He's AMAZING! There was a chunk missing from the right arm, but he fitted another piece of wood in there so you'll never know unless you go looking for it. He sanded down both of the front corners. He took the whole thing apart, cleaned out the old glue, and then put it all back together again good as new! It's GORGEOUS!
Linking up!


height="125"/>

A POCKET FULL OF RYE ..........
 So, after a day of pure indulgence, my sister and I went off to Rye for a couple of days. We had been invited to a 'big' party in Rye, but more of that in the next post. We booked in to ' Willow Tree House' Bed and Breakfast and what a good choice it was.


